The Basics of Motorized RV Maintenance

the Bauer's Tiffin Wayfarer driving down the road

RVs are built for adventure and can be the ultimate companions when it comes to making some amazing memories, but nothing can ruin a dream trip faster than maintenance trouble. Making preventable maintenance a top priority can help avoid major issues down the line and keep your RV running smoother and longer.

Dustin and I like to tackle maintenance on our Tiffin Wayfarer Class C based on trip length and how long our RV has been in storage. This gives us the opportunity to find any potential issues before they become major, costly problems. And while this is just a short list of the maintenance that a typical motorized RV requires, we always recommend consulting with a dealer to ensure all of your specific features are covered.

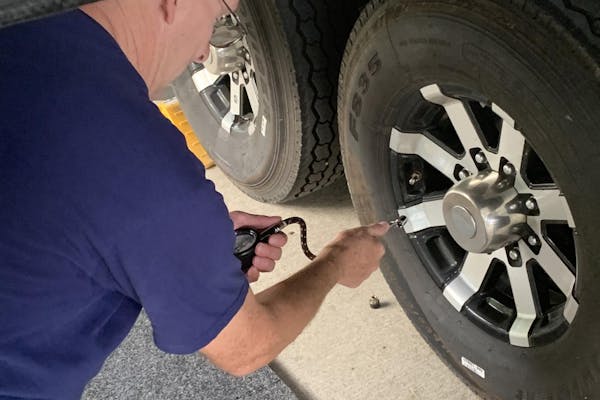
Disclaimer: Make sure you know how to safely use all of the tools mentioned below. Every RV is unique and will require different safety checks and maintenance. If you need help, please be sure to consult a professional.

Maintaining Your Engine and Chassis

First things first, be sure and read your original equipment manufacturer (OEM) manuals. We suggest spending some significant time talking to a dealer or mechanic about your particular RV and doing some research on your engine and chassis. Learn your RV’s indicator lights and never ignore them! This is especially important on modern diesel engines, as they may require a service you didn’t even know existed. Always bring an emergency fluid kit (see our kit recommendations below) and a basic tool kit on all of your excursions.

Pop the hood and do a walk-around of the RV. We like to use what I call the “touch everything” method—push, pull, clean, and look for any wear. Use a rag and wipe things down as you go to help reveal any damage or leaks that may be hidden under dirt and grime. Always, always, always check the oil. Even if you’re not due for an oil change, the levels can change based on the amount of driving, changes in seasons or if your RV has been sitting for a while. Be sure to check your windshield washer fluid and your diesel exhaust fluid (DEF). You don’t want to get caught with summer wiper fluid in a winter storm as it will freeze instantly.

If you plan to take your RV out for longer than a week or have it stationary for a few months, then we recommend checking a longer list of fluids and using a more detailed cleaning regiment. In addition to the engine oil, washer fluid and DEF, be sure to check your transmission, radiator, power steering, and antifreeze reservoir. Double check your manual to see if there is anything else pertinent that you need to inspect. After you top off all the fluids under your hood, check your filters (including your cabin air filters), wiring, hoses, and belts. Look for anything that appears to be cracked, chewed, loose, torn, or worn.

We also like to check the oil and filter on our generator. The manual on your model should give guidance on what oil to use in your generator and how often it needs to be changed. If you don’t plan to use your generator, it’s still important to run it at least once a month to help extend the lifespan. Lastly, look under your chassis and see if anything is out of place, hanging down or if there is any wear and tear. If your RV is close to a scheduled service interval, do it now, as you’ll never regret getting it done beforehand. 

Bonus Tip: To deter rodents from wreaking havoc on your RV’s electrical and interior, we recommend installing a battery-operated ultrasonic mouse repellent under your hood and using dryer sheets or peppermint-soaked cotton balls in your cabinets.

What’s In Our Engine Kit

  • Engine Oil
  • Windshield Washer Fluid
  • DEF
  • Fuel Filter
  • Various Fuses
  • Extra Gas
  • Rags
  • Gloves
  • Basic Tool Kit (with an Electrical Diagnostic Multimeter)
  • OEM manuals

Maintaining Your Tires

Like many motorized RV owners, one of our most stressful moments was due to a tire issue. If you’ve ever had a tire blowout on a windy mountain pass, you’ll never take your tire maintenance for granted again.

Before you head out—and at every stop along your trip—always double check your tire pressure. Be sure to fill each tire to the manufacturer and OEM recommended levels. Low pressure can cause too much road contact, which leads to overheating and tire blowouts. After properly filling them with air, thoroughly inspect each tire for uneven wear, nails, holes, or bulging. Then check the pressure and torque on all lug nuts, as vibrations on the road can cause the nuts to loosen.

Start with everything listed above and then take it a step farther. Get your tires rotated and inspected at a local dealer or maintenance shop before you head out. We always ask our shop to check the brakes (fluid and pads) and grease suspension components as well. And when you’re not using your RV, try to cover your tires to protect them from the sun and weather exposure. You can find affordable tire covers and RV skirts online—they’ll help save your tires in the long run.

Bonus Tip: You can keep track of your tire wear with a quarter or small coin, and then take pictures to document the changes—the farther the coin sticks out of the tire groove, the less tread your tires have. Be sure to keep an eye on the dates on your tires, as some facilities may try to sell you new but outdated tires that will quickly exceed the warranty.

What’s In Our Tire Kit:

  • Tire Gauge
  • Flashlight
  • Lug Wrench
  • 12-Volt Air Compressor
  • Tire Repair and Plug Kit
  • Collapsible Shovel (Great for Campsite Leveling)
  • Jacks
  • Spare Tire
  • LED Road Flares

Maintaining Your Batteries

Understanding battery maintenance starts with educating yourself on what type of batteries you have. Most batteries fall into one of three categories: flooded wet cell, gel cell or absorbed glass mat (AGM). Some RVs also have a lithium-ion battery but these are much less common. Here we will focus on maintenance for the most common battery type, flooded wet cell. *If this isn’t the type of battery your RV has, refer to your OEM manual for guidance.

Flooded wet cell batteries have small holes in the top that double as vents and are designed to release the sulfuric acid gas that is produced. Wet cell batteries are also just that—wet with a mixture of water and acid. These levels need to be checked and topped off periodically with distilled water (regular or tap water can cause calcium sulfation and lead to a dead battery). A well-maintained battery can last up to six years. However, if something is wrong with your battery, it will often give off a foul or chemical smell. If something smells unusual, be sure and check this as soon as possible. When dealing with your battery, always wear protective equipment, including goggles and gloves, and never smoke or have an open flame nearby.

Start with a basic visual inspection of your battery. Check the electrolyte water levels, connections and remove any visible corrosion (we like to use a mixture of baking soda and water with a small brush). Only water the battery after it is charged. However, if the plates are exposed, add enough power to charge them and then proceed with filling each cell to the bottom of the vent well. If you don’t travel regularly, you should still check your batteries every month and make sure the charge never gets below 80 percent.

If your battery has a disconnect switch, make sure it’s switched on. Then do your visual inspection and clean any corrosion. It’s worth noting that warmer temperatures, overcharging and prolonged usage will require that you check your batteries more often. On longer trips, you’ll also need to add distilled water more often, monitor the electrolyte levels and generally keep a constant eye on your charge.

Bonus Tip: You never want a 12-volt battery to drop below 12 volts (12.6 is fully charged and 10.5 is dead). Also, don’t let your batteries freeze! During the winter when we are not actively traveling, we remove the batteries from our RV and store them separately.

What’s In Our Battery Kit:

  • DC Voltmeter
  • Gloves
  • Goggles
  • Corrosion Cleaning Supplies

Maintaining Your Tanks

Most RVs come equipped with three storage tanks: freshwater (potable water for drinking and bathing), grey water (excess water drained from the sinks and bathroom), and black water (toilet waste). Our maintenance approach for these tanks is the same for both short and long trips, so we’ve broken it down by tank.

Freshwater tank sanitization is critical, especially if the water has been sitting in your tanks for a while or if you happen to run contaminated water through the pipes. There are multiple ways to approach sanitizing your freshwater tanks, with the most common being a mixture of water and bleach or purchasing a sanitizing liquid that you can flush through your tank. We use the diluted bleach method, and recommend doing this twice a year to keep you and your family safe.

Luckily, when you sanitize your freshwater tank, you’re also cleaning your grey tank—the cleaning solution in the freshwater tank cleans the grey tank as you flush it through the faucets. If you want to ensure that your grey water tank is extra clean or if you notice a smell coming from the drains, you can always put an extra cleaning additive directly into the tank. Before we head out on a trip, we like to fill our grey water tank halfway and then add a bit of dish soap to it. This way, while we’re driving, the soapy water moves around and gets things extra clean. Additionally, we rinse our tank a few times after each dump to help prevent buildup.

Cleaning and maintaining your black water tank really comes down to four basic steps. First, never drain your black tank unless it is halfway full or more. This keeps things moving along and helps prevent clogs. Second, always flush the tank after draining it to remove the buildup. Third, after flushing the tank, add some water back into it by flushing your toilet. And finally, get a good black water treatment solution and use it consistently. There are a lot of different products and options, so do some research to find out which one fits your specific RV and travel needs.

Bonus Tip: In addition to using RV-specific toilet paper, never leave your black water tank valve open when attached to full hookups. This will cause the liquids to drain out, leaving just the solids and a nightmare of a mess behind.

What’s In Our Tanks Kit

  • Black Tank Solution
  • Measuring Cup
  • Funnel
  • Bleach
  • Dish Soap
  • Gloves

Maintaining Your RV Exterior

Ideally, we’d always have a place to store our RV to protect it from the elements. But since that’s not always an option—especially when we’re on the road or in remote locations—we take great care to protect our RV’s exterior.

Before and after every trip, head to your local car wash to clean your RV. Dirt, oil, grease, and bugs are much easier to clean when you do it right away. Once your RV is clean, inspect the roof, siding and the seals and rollers on any slide-outs. Be sure to clean on the inside of your windshield as well, and check for any chips or cracks that may need fixing.

In addition to washing before and after a trip, we are firm believers in getting your RV waxed every six months. We’ve found this not only provides excellent UV protection, but it also makes washing and maintaining your RV’s exterior much easier.

Bonus Tip: If you’re looking for a local car wash, read the reviews online before visiting and call ahead to check the height of the washing stalls. Some places have large truck bays that can fit an RV, but you’ll also want to make sure you have enough room to pull in and turn around.

What’s In Our RV Exterior Kit:

  • Ceramic Wax
  • Microfiber Towels
  • Squeegee
  • Collapsible Bucket
  • Ammonia-Free Glass Cleaner

Maintaining Your RV Interior

With four dogs, hiking boots, backpacks, and biking gear moving in and out of our RV, interior organization is a huge priority. Our biggest piece of advice is to always clean and organize right before the trip. We like to use non-slip shelf liners, collapsible storage bins, food storage containers, shelf organizers, and wall soap dispensers to help keep things neat and tidy. These items also help prevent things from moving around, spilling or damaging our cabinets while driving.

Once you’ve got your RV clean and organized, only pack what you really need. For example, do you really need three of each kitchen serving utensil? Probably not… Only packing what you truly need makes cleaning easier, keeps your RV weight down, can reduce fuel usage, and ultimately keeps you safer and happier.

Before a long trip, take everything out of your RV and do a deep clean. I know this seems daunting but emptying your RV not only gives you an opportunity to evaluate what you actually use, but it can also reveal issues like a dripping sink, rodent damage, a water penetration issue, or a loose connection.

Bonus Tip: While cleaning your RV, take a moment to check your safety gear. Fire extinguishers, smoke detectors and carbon monoxide meters all need to be inspected regularly. Be sure and bring an extra set of batteries for these just in case.

Our final tip to get you on your maintenance journey is to make a maintenance checklist or journal. This doesn’t have to be anything fancy—it can simply be a list in your phone. Not only will it remind you of what to check each time, but you’ll also know exactly when things need to be serviced again. And while this list might start to get long or feel overwhelming, trust us when we say that a properly maintained RV will pay you back with plenty of safe excursions and cherished family moments for years to come.

Dustin and Sarah own a 2020 Tiffin Wayfarer 25RW.

Find Your Perfect RV

Whether you're new to the world of RVing or you're ready to narrow your search, we're here to help you sort through it all and find the RV that's right for you. Explore RVs based off of your lifestyle and the features important to you.

Find Your RV
An travel trailer RV parked in a green field.