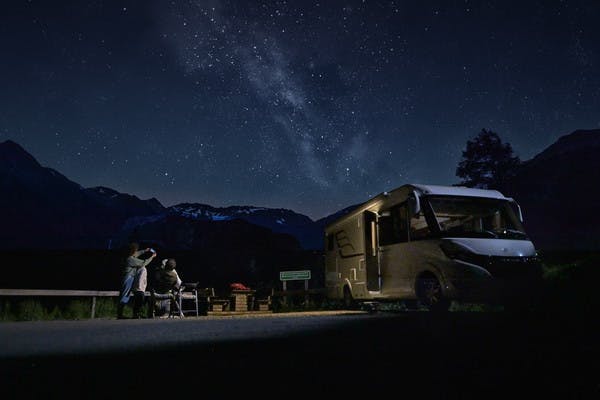
An RVer’s Guide to Stargazing

Alison Takacs's Jayco Jay Flight parked at a campground as the sun rises.

As a child, nature was my playground. My family didn’t have an RV when I was growing up, but we still found time to go on plenty of camping trips. We’d pitch a tent, roll out our sleeping bags and gaze up at the stars. Ever since I was little, I always found the night sky intriguing—being away from the bright lights of the city seemed to open up an entire new world of stars, plants, and constellations. I will never forget my first views of the bright orange lunar eclipse, the dancing of the northern lights or the subtle haziness of the Milky Way.  

It’s really no surprise then that I met my husband Jason through our mutual love of the outdoors. Whenever possible, we would pack the car and head out of the city, sometimes for weeks at a time. After moving to Texas and starting a family, we had to approach our camping adventures a little bit differently. We wanted to share these experiences with our children in a way that was both enjoyable and comfortable for them. And purchasing an RV was the perfect way to do exactly that. We knew the kids needed a balance between nature and technology, especially on long trips, but we didn’t want to limit their time outside by staying in hotels. Having an RV has allowed us to explore year-round, stay outside well after sundown and fully experience those same stars that mesmerized me as a young girl. Now, when my boys look up at the night sky and I see their amazement at the many celestial objects, I am overwhelmed with joy.

Seeking Darkness

A century ago, people could look up from almost any vantage point and see a completely star-studded sky. But with the growth of cities and increased use of artificial light, these purely starry skies are harder to come by. However, my family and I make a point to study dark sky maps and take RV trips specifically to see these places. DarkSiteFinder is one of my favorite resources to find the best starry skies—it’s a color-coded map that illustrates light pollution using the nine-class Bortle Scale. The best locations for stargazing are a Bortle 1, while the details in the sky diminish with each increment, ending with a heavily light-polluted Bortle 9. 

There are a number of state and national parks that boast about their dark skies, but with these dark skies often comes remoteness and isolation. It’s important when visiting dark parks to take extra care in planning when and how to get there. Be sure to consider the proximity to gas stations and any additional steps to ensure an adequate supply of water and power for the duration of your visit. It doesn’t hurt to have extra of both. Some parks also have primitive access, which usually means you can access the park grounds via a remote dirt road. If you do decide to travel on unpaved or unfamiliar roads with your RV, it’s always a good idea to compare these routes with a trucker’s atlas to help ensure a safe arrival.

The Starry Night Campsite

When selecting a campsite for stargazing, there are some key factors to take into consideration. Wide, unobstructed views are ideal, so try to select a site with few trees and a clear view of the horizon. Additionally, the less light you produce, the better. Try to keep campsite lights to a minimum to allow your eyes to adjust and become more sensitive to the stars above. It’s also courteous to other campers to keep your personal light pollution low.

That being said, a little bit of light is necessary for safe star viewing—you don’t want to trip or fall on something as you make your way through the dark! To help adjust your eyesight, invest in a red flashlight or a headlamp with a red light. The red light helps preserve night vision and decrease the overall light signature in low-light situations.

Star Viewing Must-Haves

A map of the stars is a must-have when taking a tour of the sky. I like the SkyGuide app which uses a compass to identify celestial bodies in real time and is simple to navigate. These apps often come loaded with great information too, like when the next meteor shower is occurring or when a particular planet will rise. 

Although stargazing can be enjoyed with the naked eye alone, a small telescope or a pair of binoculars can really enhance the experience. When we are camping within a few hours of home, we will often bring our Dobsonian telescope. With limited space in our travel trailer, we opt to swap out the telescope for a pair of Nikon binoculars on our longer treks. While viewing the stars through a pair of binoculars, I recommend using a tripod for stabilization so the object being studied doesn’t jump around in the visual field.

Capturing the Night Sky

As a landscape photographer, I love photographing a night sky filled with stars—commonly referred to as astrophotography. When preparing for a trip to a dark sky park, I try to study our campsite using satellite maps. I prefer sites that are set apart from the rest or have a particular angle in relation to Polaris or the Milky Way. I also try to consider when we will be visiting the campsite and what phase the moon will be in. The best astrophotography occurs under a clear, moonless sky. However, a little bit of moonlight isn’t terrible. In fact, I often use the moon as my own personal studio light for capturing both the sky and the foreground scenery. My favorite app for knowing the moon phase on a particular date is MoonPlus.

It’s worth noting that you don’t need an expensive, fancy camera to get some great nighttime photographs. There are some simple adjustments you can make on any basic point-and-shoot camera, some of which can even be applied to your smartphone’s camera app.

Here are a few tips and suggestions for capturing the best starry night astrophotography:

  1. Invest In A Tripod. Tightly secure the camera to a sturdy, immobile surface, such as a tripod. Any movement the camera incurs during a long exposure will result in a blurry image.

  2. Use the Timer Feature. To avoid unnecessary blur, use the camera’s timer feature. Pressing the shutter button to begin the process can actually cause movement to the camera body and result in a blurry photo.

  3. Try Manual Focus. Turn off your camera’s autofocus and manually focus on a bright star instead. Autofocus will not work well in low light, so take it into your own hands. You’ll know the star is in focus when it appears as small as possible in the viewfinder.

  4. Keep the F-Stop Wide. Use the widest f-stop your camera lens allows for maximum light absorption. This can be changed depending on how much light is in the vicinity but an extra wide f-stop is a good place to start.

  5. Slow Down the Shutter Speed. Try to slow the shutter speed to 20-30 seconds. A good rule of thumb is to divide the focal length by 500 in order to get the longest exposure and the clearest picture.

  6. Find the Right Balance. Increase the ISO until a good exposure is reached in your viewfinder. Too much ISO can cause unwanted noise and too little can make an image super dark. Finding the right balance between the f-stop, shutter speed and ISO is key to astrophotography.

Alison Takacs and her family travel in a Jayco Jay Flight.

Recommended Places To Stargaze

Find Your Perfect RV

Whether you're new to the world of RVing or you're ready to narrow your search, we're here to help you sort through it all and find the RV that's right for you. Explore RVs based off of your lifestyle and the features important to you.

Find Your RV
An travel trailer RV parked in a green field.